Computational graph 相當於 NN 的一種 IR (intermediate representation) 表達方式.
在 PyTorch 的 nn.Module 裡通常由 user 來定義 forward 函式藉此來表達這些 ops 怎麼關聯何其執行順序.
但在 torch.fx 把 NN 改由 Graph 來定義該怎麼 forward. 精確來說, 一個 GraphModule 包含了原本的 nn.Module 之外, 還包含了一個 Graph 物件, 並且Module 裡的 forward 函式改成由 Graph 物件來 ”自動生成”.
這樣做有許多好處, 例如可以自由地對 Graph 修改後, 再重新產生 forward. 更多請參考官方文件說明.
例如一些操作範例: [Replace one op], [Conv/Batch Norm fusion], [replace_pattern: Basic usage], [Quantization], [Invert Transformation]
當我在看 Replace one op 的時候, codes 雖然非常短, 但其實我產生了很多底層 graph 操作的疑問.
因此仔細對照 source codes 理解後特別紀錄一下.
相信對 Graph, Node, 和底層 fx 怎麼運作會有初步比較好的理解.
Topological List of NN
Graph 就是一個 NN 的 DAG (Directed Acyclic Graph) 每個 node 代表執行哪種運算, edge 連接著不同 nodes 代表輸出輸入的關聯.
我們在執行 NN 的 fowards 的時候, 會需要一個執行 nodes (運算op) 的順序, 稱為 topological order. (請自行搜尋 “Topological Sort”)
這個 topological order 不唯一. 但表明了照著這個 order 來執行所有 nodes 就可以跑完這個 NN 的 forward graph.
Graph 的 attribute nodes 保存了這個 topological order 的 list. 事實上使用 doubly-linked list 來實作.
因此可以看到 Node 有兩個 attributes: _prev 和 _next 分別存著前一個或下一個 topological order 的 node.
注意到
_prev和_next指的是 topological list 的連結, 不是 Graph 圖 (DAG) 的 nodes 的 edges 關聯喔.
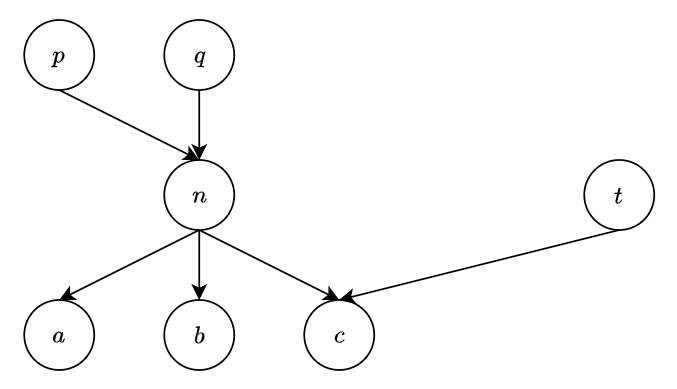 以這個圖來說, 隨便列出兩個可能的 topological list 為:
 [p, q, n, t, a, b, c], [q, p, n, t, b, a, c] , 所以不同的 list n._prev 會不同, 一個是 q, 另一個是 p.
DAG 中 nodes 的關聯 (edges) 儲存在 Node 的 attributes: _input_nodes 和 users.
- _input_nodes: 說明此 node 的 input nodes 是那些, 建議透過 all_input_nodes() 來獲取
- users: 有哪些 nodes 需要使用此 node 的結果, 這個很重要, 當 users 為空的時候, 代表沒有任何 nodes 需要使用此 node, 因此可以被安全刪掉. (Graph 的 erase_node 判斷條件)
同樣以上面的圖來舉例, n._input_nodes=[p, q], n.users=[a, b, c].
這兩個 attributes _input_nodes 和 users 相當重要, 會反覆用到.
Node 基礎屬性
列出 Node 一些基礎 attributes
基本上 node 有分五種 opcode, 存在 attribute op 中: placeholder, get_attr, call_function, call_module, call_method, 和 output. 這五種 opcode 的說明參考 source code 說明.graph 表示此 node 隸屬於哪個 Graph, name 則表示該 node 唯一的名稱, target 可以想成該 node 實體運算是哪個 function/module/method. _input_nodes 和 users 剛剛上面有提到.
在 init 一個 node 的時候, _update_args_kwargs 底層是 C codes 看不到, 但其實他會默默做一些事情, 包含更新 args, kwargs 和 self 這些 nodes 的 users 正確性. 這在後面的例子會看到.
Node 對 Topological List 的基礎操作
對這個 doubly-linked list (topoligical list) 的基礎操作 next, prev, prepend, append 如下:
不厭其煩說一下, next, prev, prepend, append 這四個操作只改變 “OP 執行順序”, 因為改的是 topological list, 不是改變 DAG 圖中 nodes 的連結 (edges) 關係.
Node 對 DAG 的操作
接著以下的幾個 Node 操作就會改變 edges 了 (動到 _input_nodes 和 users 兩個 attributes)
先來看看 args, 其實 codes 寫得很清楚, 自行看懂即可:
假設我們呼叫 n.update_args(2, r) 則表示對 node n 的 input nodes 要新增一個 node r.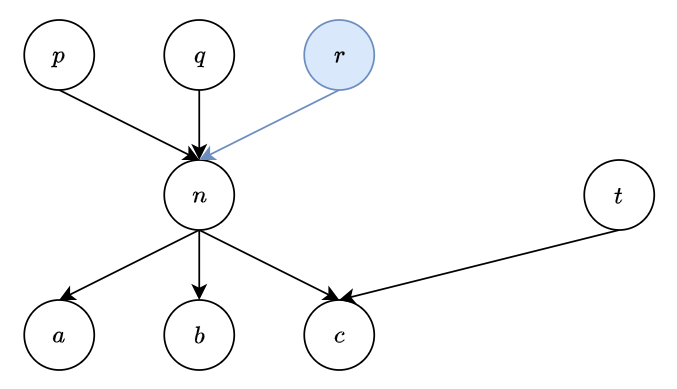 所以
所以 n._input_nodes=[p, q, r] (多一個 r), 同時 node r 的 users 也要更新 (新增 n), i.e. r.users=[n].
這自動更新相關 nodes 的 _input_nodes 和 users 的操作由 _update_args_kwargs 來完成, 這點很重要 keep in mind.
Node 重要操作 replace_all_users_with
再來另一個重要操作 replace_all_uses_with:
這 function 的目的是希望用到此 node (假設為 n) 的其他 nodes (n.users) 都改成用新的 node (假設新的 node 為 s)
對照 codes 來說明當呼叫 n.replace_all_uses_with(s) 時發生的狀況
首先假設我們建立了新的 node s, 而 Node 的初始化 __init__ 需要指定 args 和 kwargs, 我們設定成跟 n 一樣
因為 __init__ 最後會呼叫 self._update_args_kwargs(args, kwargs) (參考上面的 codes 片段), 這使得新 node 在建立之初就已經跟 nodes p 和 q 關聯起來了.
即 s._input_nodes=[p,q], 但此時 s 還沒有被任何其他 nodes 使用, 所以 s.users=[ ].
(灰框 codes 紅色那行表示目前程式執行的位置)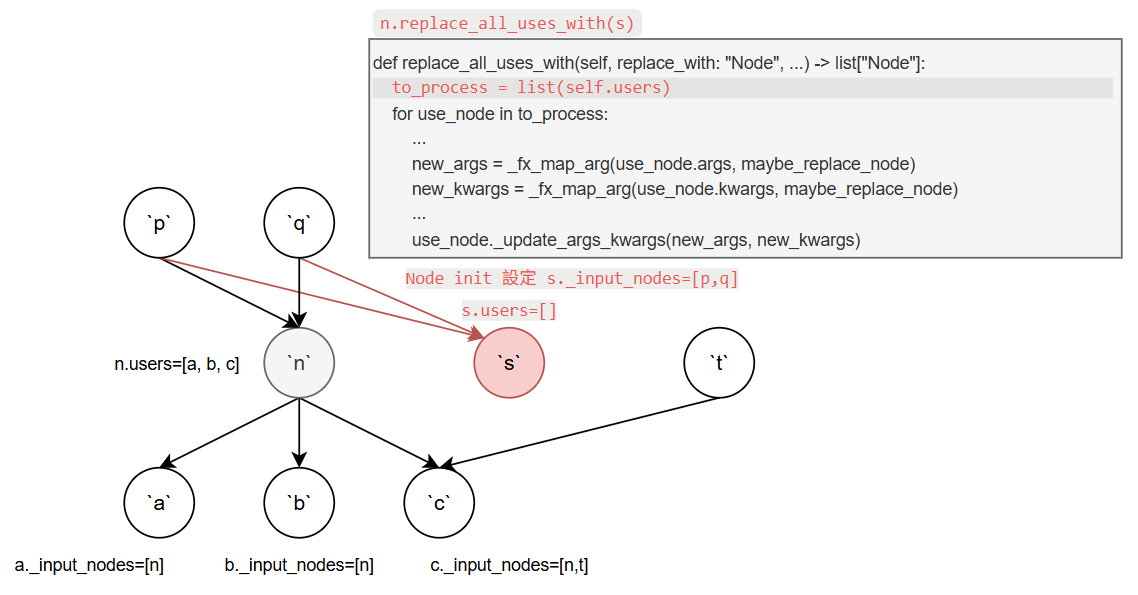
首先 to_process 為 [a, b, c]. 然後 for loop a, b, c.
第一次 iteration 的 use_node 為 a._fx_map_arg 會把 a 的 input nodes 做個整理, 意思是原本假設 input node 為 n 現在要換成 s.
因此 new_args 變成 [s].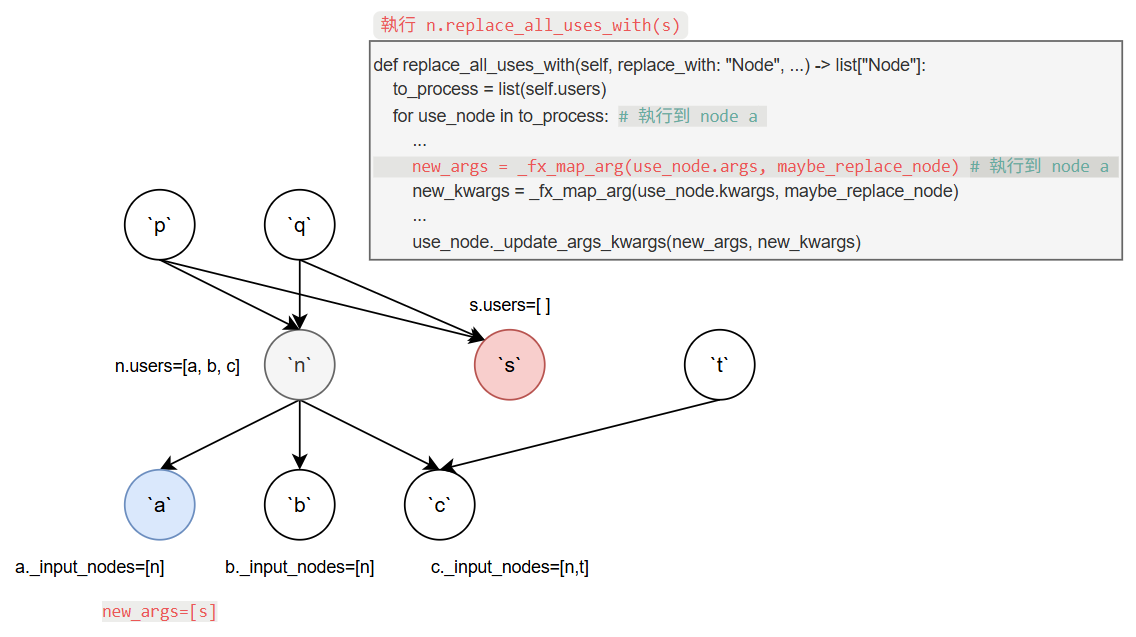
接著再透過 _update_args_kwargs 更新 node a 的 input node 為 s.
注意到之前提過 _update_args_kwargs 會自動更新相關 nodes 的 _input_nodes 和 users.
以這邊來說, 此時 n.users 會更新成 [b, c], 而 s.users 會變成 [a].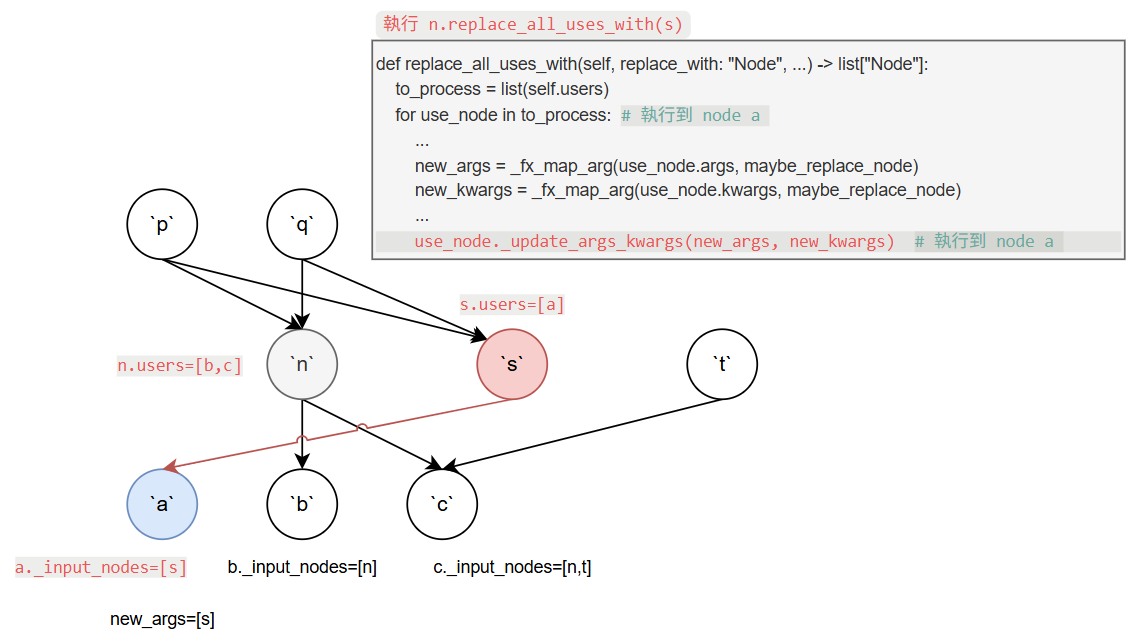
然後 for loop 繼續下去, 跑到最後一個 iteration use_node 為 c, 此時的 new_args 會變成 [s,t].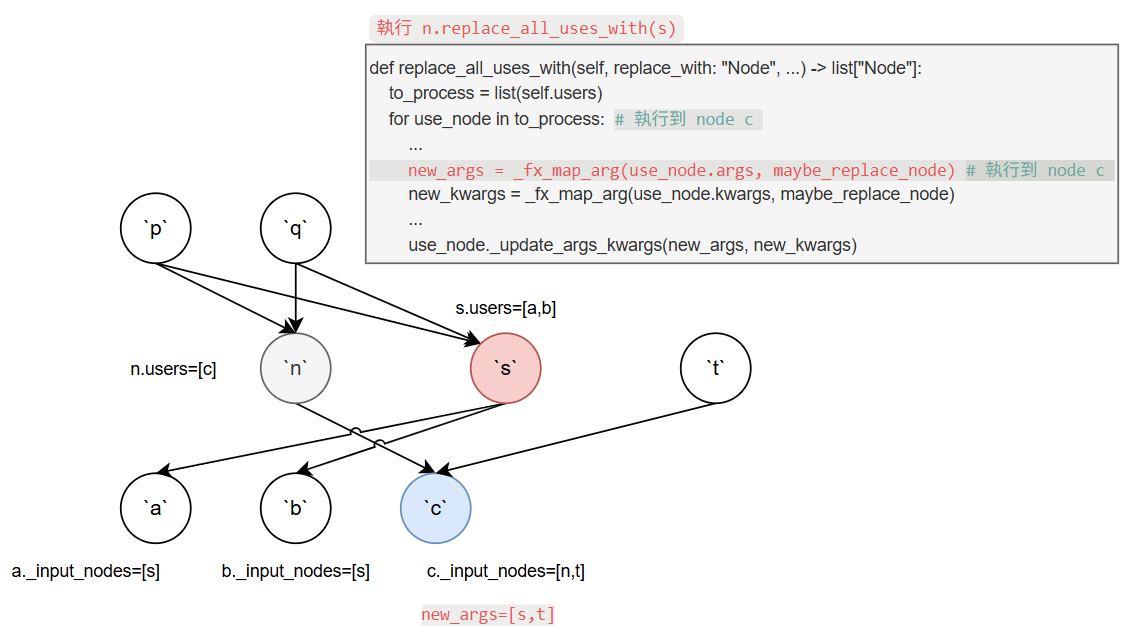
同樣再透過 _update_args_kwargs 更新 node c 的 input node 為 s, 包含自動更新相關的 _input_nodes 和 users.
得到最後的 graph 為: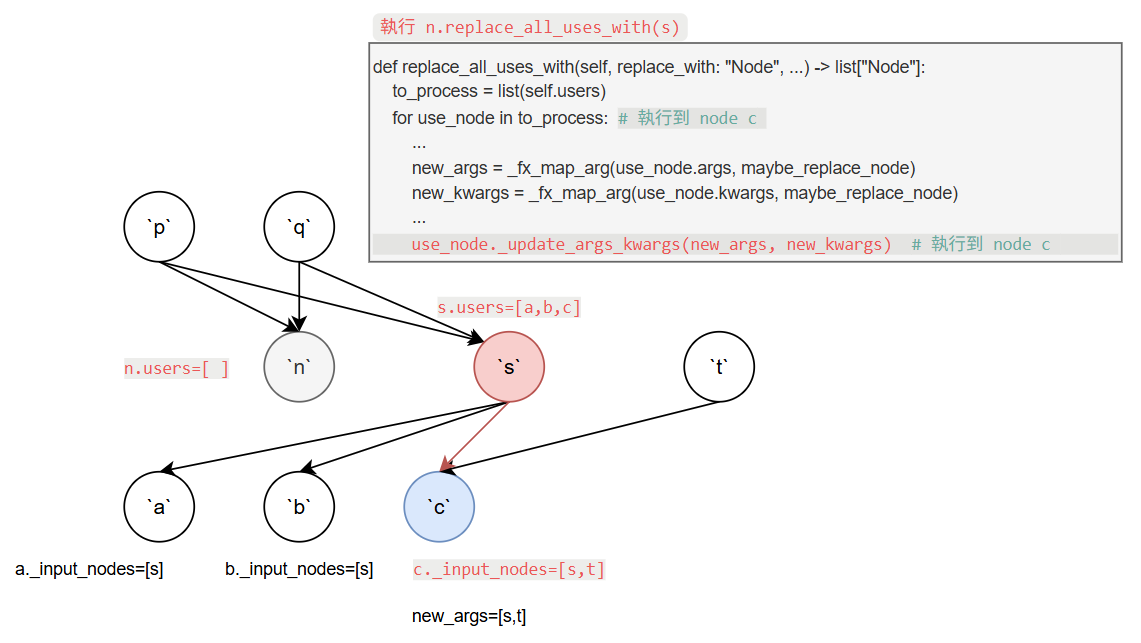 至此所有用到 node
 n 的那些 nodes ([a, b, c]) 全部替換成使用 node s 了.
Graph 的 erase_node
到這部看起來 s 已能完全取代 n 的地位, 因此我們可以呼叫 graph.erase_node(n), 能刪掉一個 node 的條件是該 node 已經沒人用了, i.e. users 為空.
另外因為 n 要被刪掉, 要更新其 parent nodes 他們的 users 屬性表明不再被 n 使用. 同時 n 的 _input_nodes 要變成空.
因此刪掉後圖最終為: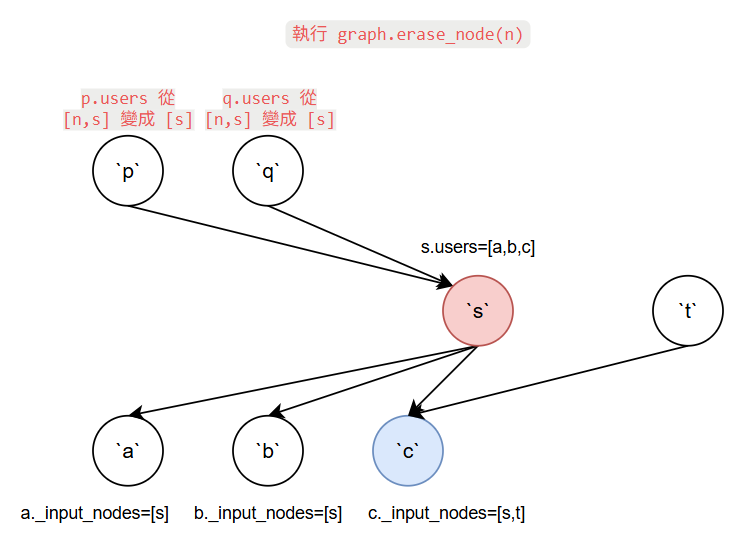
graph.erase_node(to_ereas) codes 片段為:
可以看到最後又呼叫了該 node 的 _update_args_kwargs 函式 (更新 parent nodes 的 users 屬性).
替換 Graph 中的 OP 範例
到這邊已經能全面理解 PyTroch 給的一個對 Graph 替換 op 的範例程式了: examples/fx/replace_op.py
|
|
還有一些沒提到, 例如 tracer, graph.inserting_after(n), traced.recompile(), traced.graph.lint() 等, 自行參考官方 fx 文件和對照 codes 應該也不難理解了
碎念
其實 fx 要深入研究下去還挺複雜的, 例如還有 tracer, proxy, interpreter.
另外 PyTorch 也支援使用 fx 做量化, 無奈官方文件實在寫得太少, 自己挖 code study 也辛苦沒效率.
但好在藏在 source code repo 的這幾個 README.md 才是 fx 量化文件的真身:
- torch/ao/quantization/fx/README.md
- torch/ao/quantizaqtion/backend_config/README.md
- rfcs/RFC-0019-Extending-PyTorch-Quantization-to-Custom-Backends.md
總之, 這篇只算是一個基礎入門的筆記, 後續有用到再繼續研究即可
本文圖檔: all_fx_nodes.drawio