Udacity Self Driving Project 3: behavioral cloning
A great simulator is provided that can log your driving data (speed, throttle, brake, steering, and images) and test the driving algorithm.
Two modes are provided, Training mode and Atuonomous mode. By using Training mode, you can collect training data to train the model. Then test the model with the Atuonomous mode.
For those driving log data, steering and images are the most important features that we are going to use in this project.
The goal is, given an image, find out the corresponding steering angle.
Some might wonder that speed, throttle, and brake are features that are useful too.
Also, driving images are time correlated, not just a given static image.
With ignoring so much useful information, does the goal still reasonable?
Nvidia just showed it works! and works pretty well!
So our first step is to collect the data, and fortunately, Udacity provides data for us and I used it for training.
Training Data Analysis
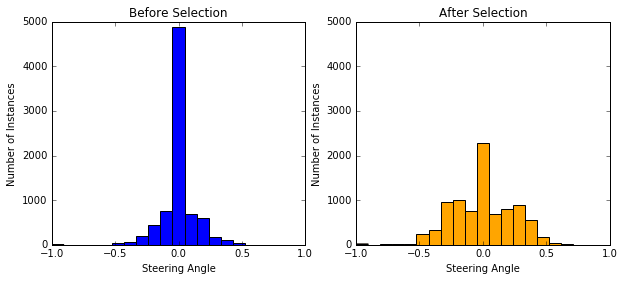
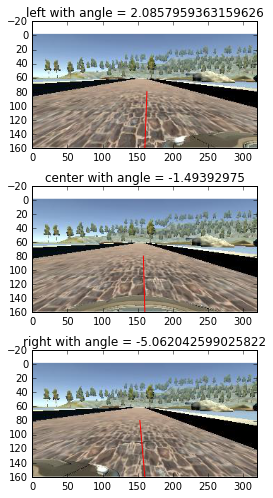
8036 data are provided. Each data has 3 positions of images (left, center, right) with 1 corresponding steering angle.
Most of angles are 0, and I found that randomly ignoring half of 0-angle data is fine and can speed up. Moreover, I duplicated some samples that has angles within the range +-[0.2, 1] in order to balance the data.
Histograms of before/after data selection are shown below:
Data Augmentation
Data augmentation is a practical way to avoid overfit and generalized the model. I used 5 types of augmentations:
Flipping – Flipping is a useful way to balance both turns of data. For each data, a 1/2 probability is used to decide wheter to flip. Also, steering angle is multiplied by -1.
Horizontal shift – [-20,+20] pixels are randomly selected as the shift value. By doing so, it can help to recover the vehicle when it goes outside the lane.
By referencing this article, I added 0.004 steering angle units per pixel shift to the right, and subtracted 0.004 steering angle units per pixel shift to the left.
Results in [-0.8~+0.8] steering values adjustment which corresponding to [-2~+2] degrees (steering value * 25 = degree)
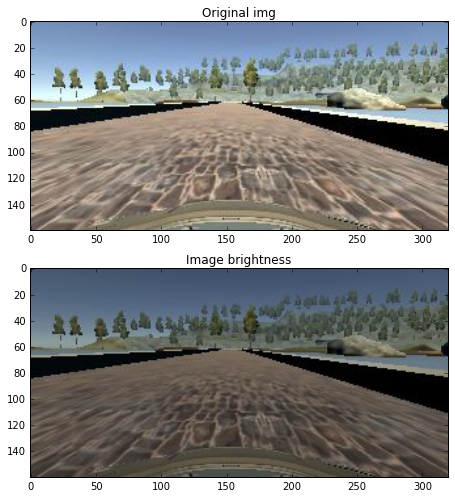
Brightness – Brightness is done in the “HSV” domain. I found that with a ratio of [0.5~1.1] for “V” domain works fine.
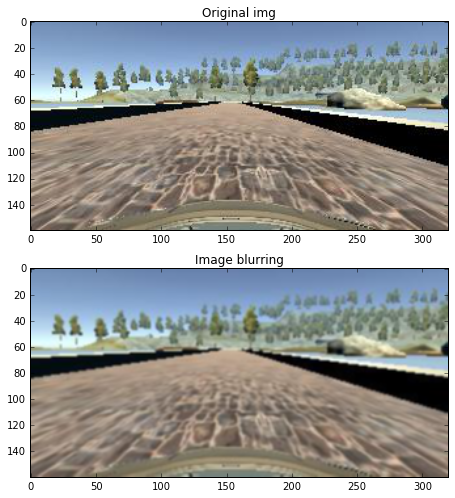
Blurring – A Gaussian blur with kernel size 3 is applied. Not sure how useful of this method helps for robustness.
- Left/Right camera images – These left/right images are very useful for data augmentation and also help for recovering off-lane driving.
Udacity: You also might wonder why there are three cameras on the car: center, left, and right. That’s because of the issue of recovering from being off-center.
In the simulator, you can weave all over the road and turn recording on and off. In a real car, however, that’s not really possible. At least not legally.
So in a real car, we’ll have multiple cameras on the vehicle, and we’ll map recovery paths from each camera.
I adjusted the steering angles for left/right images with a naive method. Following figure shows how I correct the angle of right image:
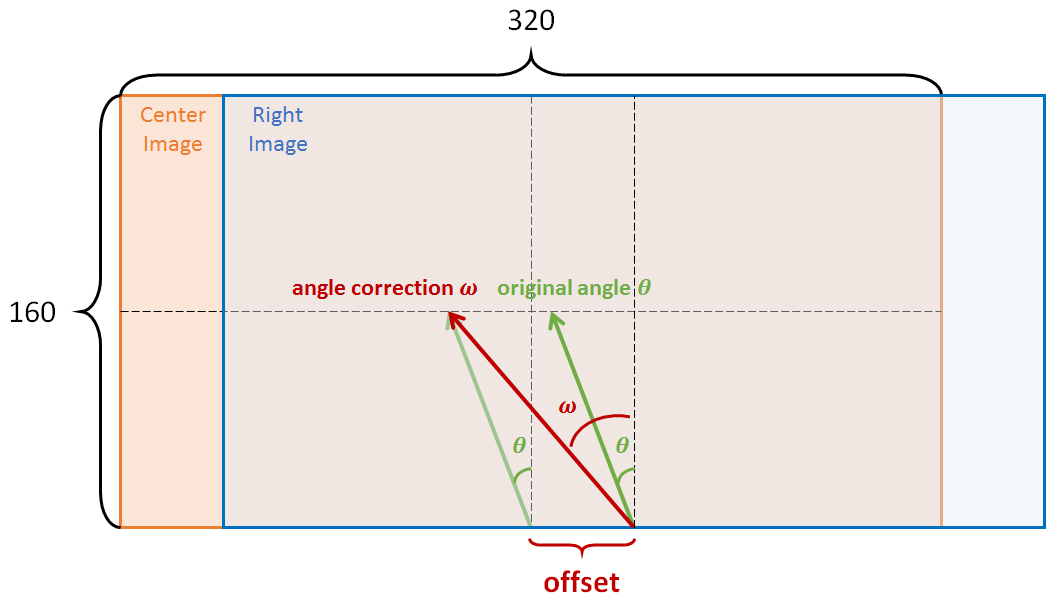
I found that setting offset = 6 or 5 is good enough. For large value, the car starts zig-zagging. An example of correction shows below, where the steering angles are indicated by red lines:
Data Normalization
- Normalization – Images are normalized with (x-128)/128.
- Cropping – Images are trimmed with 40, 20, 20, and 20 pixels from top, bottom, left, and right respectively. This will cut most of the car hood and sky.
- Resizing – resized to 66 x 200, same as NVIDIA CNN.
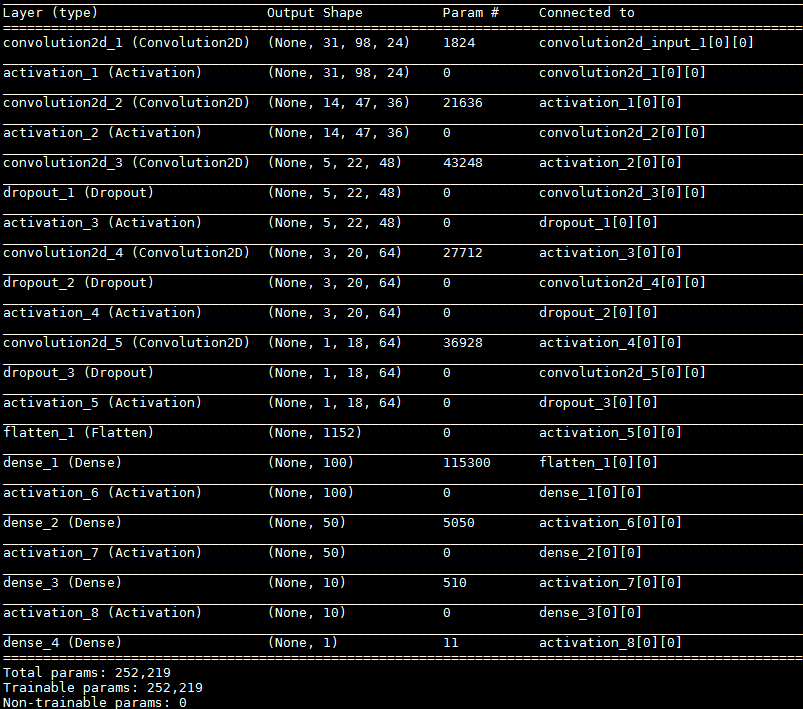
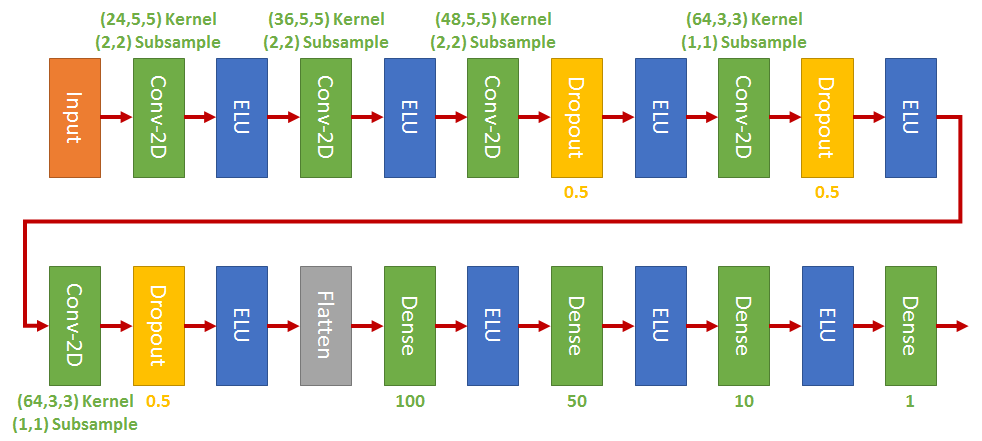
Model Architecture
I adopted NVIDIA CNN with dropout layers:
Generator and Training
- Generator: It is very useful to use a python generator to feed the training data batch-by-batch rather than loading all the data in memory at once.
A useful link to learn python iterator/generator list here ( for those who doesn’t familiar with python just like me :) ).
In order to further speed up. I tried pre-loading a chunck of data, e.g. 5000 images, into memory, and loaded another chunck if the batch data (required by generator) is outside the chunck in memory. However, it does not speed up! Somewhat weired.
For each input images, a position is randomly chosen (left,center,right).
Then flipping and shadowing are applied with a random fair coin. Finally, brighteness and horizonal shift are adopted with the corresponding angle adjustment.
- Training: Some hyper-parameters are listed:
- epoch–50
- samples for each epoch – 8896
- optimizer – Adam with 1e-4
- batch-size – 64
Although Keras did shuffle, it only applies in the batched data. So I shuffled the entire training set for each epoch to get more de-correlated data.
Driving Policy
I found that instead of giving a constant throttle, controlling to a constant speed is more stable to drive.
So I used a simple policy that tries to keep speed near 20.
|
|
Results
See below for the track1 drive.
However, I failed on track2. Hit a wall during a right turn and still working on it.
Hope some tweaks on data selection and model architecture might work~