NN 在做 quantization 時採用的是非對稱的方式, real ($r$) 和 quantized ($q$) values 對應關係如下:
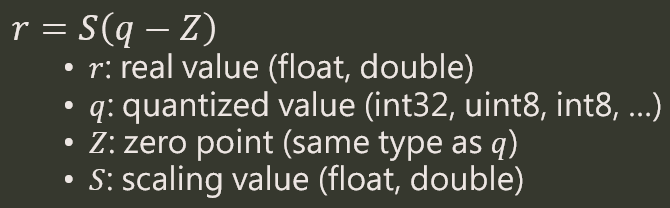
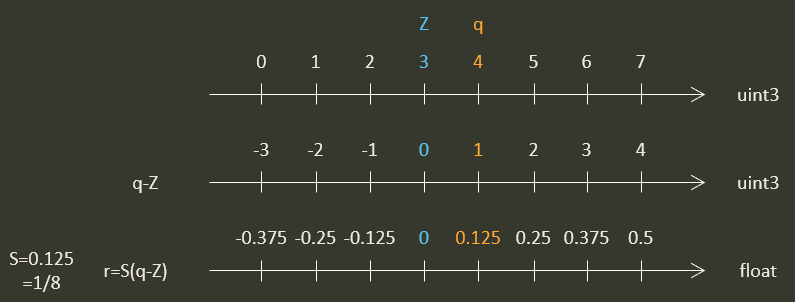
其中 zero point $Z$ 會跟 $q$ 相同 type, 例如 int8, 而 scaling value $S$ 則會跟 $r$ 相同, 例如 float. 以 uint3 (0~7) 做 quantization, 如下圖所示:
本篇討論以下兩點:
- 同一個 real 值如何在不同的 $Z$/$S$ 做轉換, e.g.: $q_1$ with ($Z_1$/$S_1$) 如何對應到 $q_2$ with ($Z_2$/$S_2$)
- PyTorch 的 Quantization Aware Training (QAT) 討論
在不同 $Z$/$S$ 轉換有兩個常見理由: 在做 NN 的 quantization 時候, 每個 layer 的 output domain 都不同, 這導致了使用不同的 $Z$/$S$. 又或者丟給 NN 做 inference 之前, mfcc/mfb 需要先轉換到 NN input 的 $Z$/$S$ quantized domain 上.
額外提一點 PyTorch 的 quantized Tensor 其實就只是比原本的 Tensor 多了 $Z$ and $S$. 例如給定 $Z$ and $S$, torch.quantize_per_tensor 會將一個正常的 tensor 從 $r$ 轉成 $q$, 官網範例:
|
|
以下我們都以 uint8 當作 quantized 的 type, real value 以 float (4 bytes) 為準. 而 int 為 4 bytes.
先使用 Float 轉換
要將第一個 domain ($Z_1$/$S_1$) 的數值轉換到第二個 domain ($Z_2$/$S_2$) 最簡單的方法就是先把第一個 domain 的 $r_1$ 算出來, 再利用第二個 domain 的 $Z_2$/$S_2$ 求得 $q_2$
$$\begin{align} \color{orange}{r_1}=(float)\left( \left( (int32)q_1-Z_1 \right)*S_1 \right) \\ q_2=\text{uint8_saturated_round}\left( \frac{\color{orange}{r_2}}{S_2}+Z_2 \right) \end{align}$$由於 $r_2=r_1$ 因此 (2) 可計算出 $q_2$. 但這樣計算還是用到 float, 其實我們可以完全使用 integer 運算來達成.
純用 Integer 運算
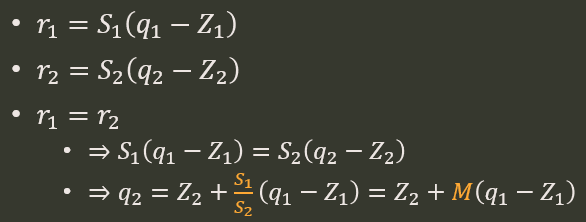
其中 $M>1.0$ 是沒有意義的, e.g. $S_1>S_2$. 如下圖舉例來說, data domain 分布只會在 8 個點位置上, 使用更細的 resolution 去存沒意義.

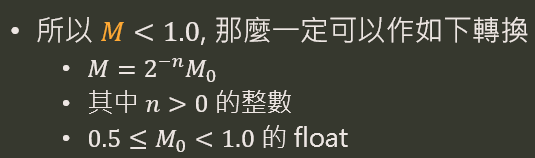
$M_0$ 很明顯可以用 Q0.31 的 int32 來保存, 所以 $M_0$ 與 $(q_1-Z_1)$ 相乘的時候使用 fractional multiplication, 最後 $2^{-n}$ 使用 shift 即可.
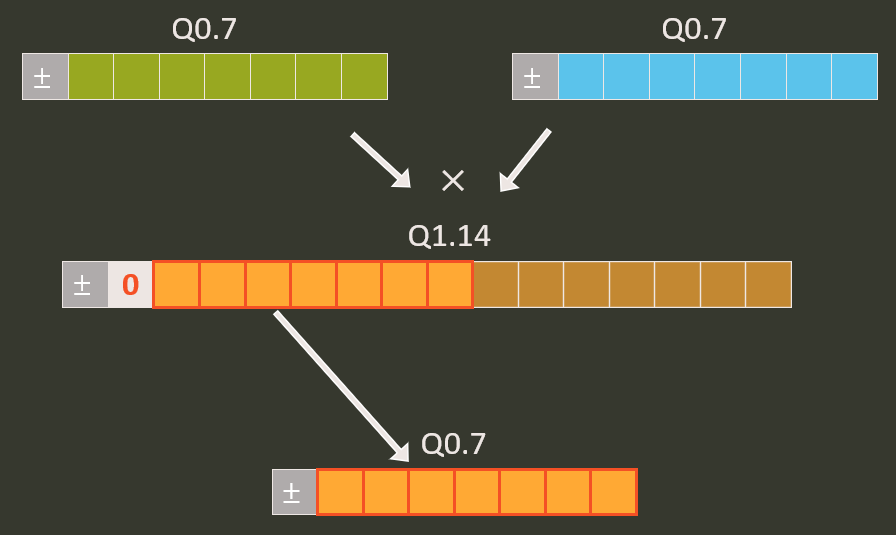
什麼是 fractional multiplication? 一張圖表示就知道:
最後我們要驗證的話其實可以跟上一段講的 Float 版本對比就可以.
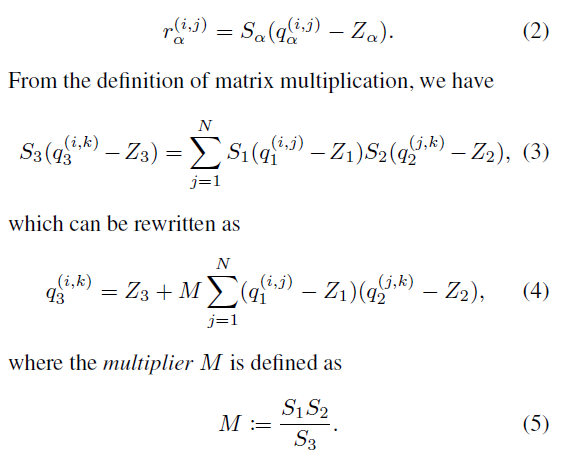
矩陣運算的 Quantization 轉換
其實 convolution 裡的矩陣運算只是原來的 $r_2=r_1$ 變成 $r_3=r_1r_2$ 的關係而已, 其餘都相同. 貼一張論文的內容即可.
更多內容可以參考論文 ref [1], 例如使用 ReLU6 替代 ReLU, 因為如果我們使用 uint8 的話由於 ReLU6 將 domain 限制在 [0,6] 之間, 這樣 8 bits 可以用 $Z=0$, $S=1.0/2^5=0.03125$ 來表示. 同時最後再轉換成 quantization model 時可以直接拿掉 ReLU6 (因為直接使用 quantization 就好)
Symmetric Fixed Point
傳統上常見的 fixed point 採用的是 symmetric quantization, 例如 Q4.3 這種 int8 的表示方式 (-8.0 ~ 7.875). 但它其實只是 asymmetric quantization 的特例.
Q4.3 基本上就是 $Z=0$ 和 $S=1.0/2^3=0.125$ 的 asymmetric quantization.
PyTorch 的 Quantization Aware Training (QAT) 筆記
PyTorch 1.7.0 quantization doc
一開始要先對你的 NN Module 先作如下改動:
- 在自己定義的 NN Module 裡, 所有用到
torch.nn.functional的 op 都轉換成torch.nn.Module - 在自己定義的 NN Module 裡,
forward時先將 input 過QuantStub(), 然後最後 output 過DeQuantStub().QuantStub()會將正常的 input tensor 變成 quantized tensor (裡面包含 $Z$/$S$), 然後DeQuantStub()會將 quantized tensor 轉換成正常的 tensor. - 在自己定義的 NN Module 裡, 使用
torch.quantization.fuse_modules定義你的fuse_modelfunction. 目前 PyTorch 只支援有限種 modules fusion (see functionfuse_known_modulesin fuse_modules.py).
接著 QAT 為以下幾個步驟:
- 將 NN 的 object (
net) 設定為net.train()(如果只是做 post-quantization 則用net.eval()).
這是因為 QAT 要在 training 時模擬 inference 的 quantization precision loss, 所以要插入很多 fake-quantization 的 op. 可以參考論文 ref [1] 的 Figure C.4 到 Figure C.8. 而如果只是 post-quantization 則在原來正常的 floating trianing 完後, 將net.eval()設定好直接就 fuse model 了 (torch.quantization.fuse_modules對是 train or eval 有不同的 fuse 行為). - 呼叫
net.fuse_model().
例如假設我們要 fuse['conv1', 'bn1', 'relu1'], PyTorch 會將第一個 Module 變成 fused Module, 剩下的兩個為Identity()Module - 將
net設定 attributeqconfig.
例如:net.qconfig=torch.quantization.get_default_qat_qconfig('fbgemm') - 呼叫
torch.quantization.prepare_qat(net, inplace=True).
此 function 主要幫你做兩件事情:
a. propagate qconfig: 對所有子 Module 設定相對應的 qconfig (因為步驟3我們只針對 root Module 設定 qconfig)
b. add observer/fake-quantization: observer 為簡單的 min/max 線性量化方式(或 histogram 方式等). 將圖需要 quantization 的地方安插好這些 observer/fake-quantization. - 執行一般 training 流程.
在 training 的過程中就會順便統計好對應的 min/max 等, 然後每個 tensor 的 $Z$/$S$ 也會對應得到 (通常用 moving average 方式做 smoothing). - 最後轉換成 quantized model
torch.quantization.convert(net, inplace=True)
以上一個最小範例如下:
|
|
最後附上一個很棒的 convolution and batchnorm fusion 解說 [連結], 作者是 Nenad Markuš