import torch
import torch.nn as nn
import torch.nn.functional as F
from torch.export import export

from common.graph_utils import node_rows, short
from common.models import example_inputs, get_model
from common.pt2e import quiet
from common.viz import draw_stages, table

quiet()
_ = torch.manual_seed(0)M00-1 | torch.export 出來的圖長什麼樣,以及 ATen 是什麼

PT2E 的每一步都在 torch.export 產生的圖上進行。這本 notebook 分兩段:
- A. export 之後的圖:
torch.export.export()回傳什麼、ep.module()又是什麼、每個 node 上帶了哪些資訊。 - B. ATen 是什麼:
aten.conv2d.default這串名字怎麼讀;為什麼不同的 Python 寫法,export 之後會變成同一串 op。
A. export 之後的圖
模型是 ConvBnReLU(conv → bn → relu),先呼叫 .eval()(為什麼要先決定 eval/train,見 M00-2)。
A1. torch.export.export() 回傳 ExportedProgram
ExportedProgram(下面叫 ep)有三樣東西:圖 ep.graph、說明圖上每個輸入是什麼的 ep.graph_signature、以及參數和 buffer 的值 ep.state_dict。 在 ep.graph 裡,參數、buffer 和使用者的輸入 x 都是 placeholder(圖的輸入)。 graph_signature 負責記下哪些 placeholder 是模型狀態、對應原模型的哪個欄位:
model = get_model("conv_bn_relu").eval()
ex = example_inputs()
ep = export(model, ex)

table([[spec.arg.name, spec.kind.name, spec.target] for spec in ep.graph_signature.input_specs],
["placeholder", "kind", "target(原模型的欄位)"])| placeholder | kind | target(原模型的欄位) |
|---|---|---|
| p_conv_weight | PARAMETER | conv.weight |
| p_bn_weight | PARAMETER | bn.weight |
| p_bn_bias | PARAMETER | bn.bias |
| b_bn_running_mean | BUFFER | bn.running_mean |
| b_bn_running_var | BUFFER | bn.running_var |
| b_bn_num_batches_tracked | BUFFER | bn.num_batches_tracked |
| x | USER_INPUT |
名稱前綴 p_(parameter)、b_(buffer)只是方便閱讀的慣例;可靠的分類是 kind。 只有 x 的 kind 是 USER_INPUT,其他都是模型狀態。
A2. ep.module() 回傳 GraphModule
PT2E 的 prepare_pt2e 吃的是 ep.module():它依 graph_signature 把 state_dict 綁回去,得到一個可以直接呼叫的 GraphModule。 下圖上面是 ep.graph,下面是 ep.module() 的圖;這次把參數也畫成獨立的 node(show_params=True)。
gm = ep.module()
draw_stages([(ep.graph_module, "ep.graph(ExportedProgram)"), (gm, "ep.module()(GraphModule)")],
            show_params=True, per_row=1, title="參數從 placeholder 變成 get_attr")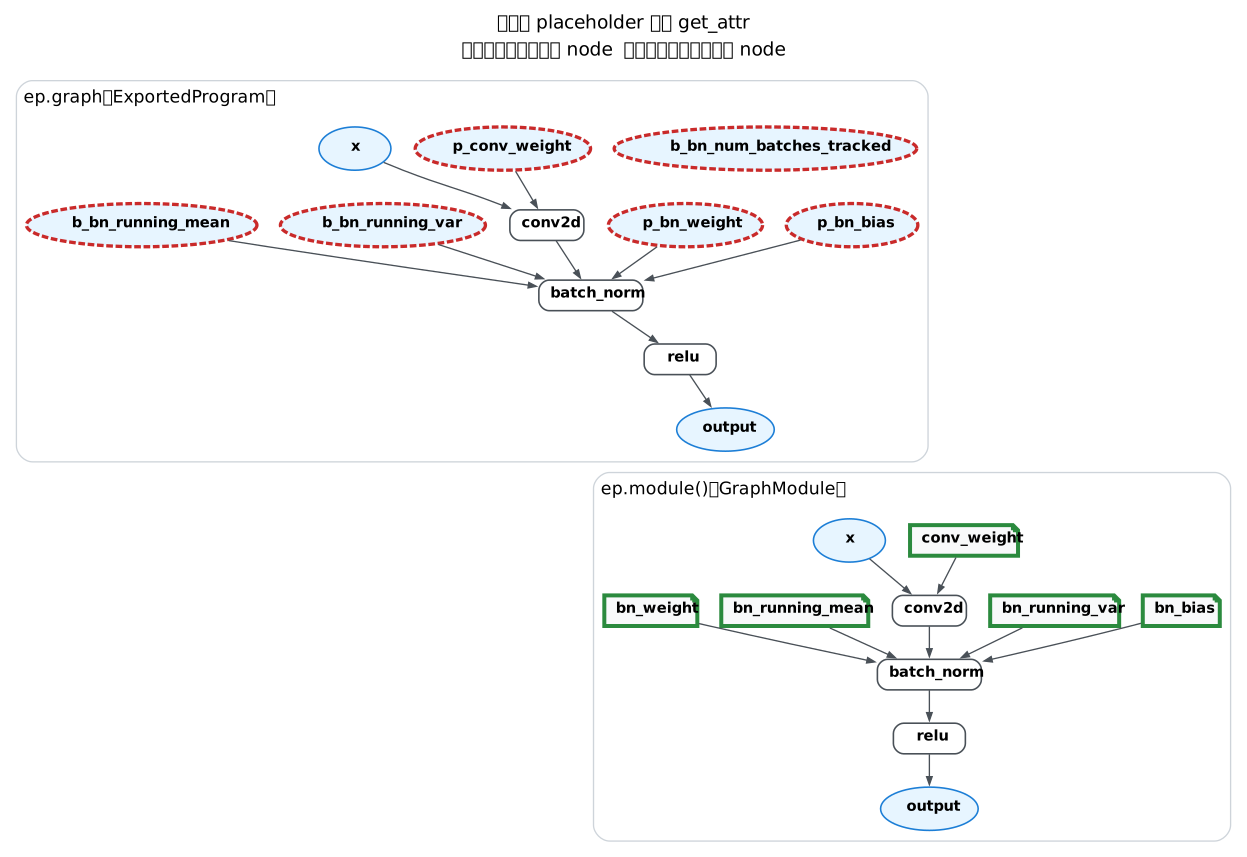
請看三件事:
- 上面的
p_conv_weight、b_bn_running_mean… 是 placeholder(橢圓,下一步消失);下面變成get_attr(摺角方塊,綠框),從 GraphModule 自己身上讀屬性。 nn.Conv2d、nn.BatchNorm2d這些 module 不見了,只剩conv2d、batch_norm、relu三個運算。整張圖是扁平的:沒有 module 的階層,只有一串 op。 所以 PT2E 要找「conv 後面接 relu」只能比對圖上的 op 樣式,不可能靠「換掉某個 module」。b_bn_num_batches_tracked在 eval 模式下沒有人用(M00-2 會看到 train 模式下誰用它)。
逐 node 列出來。op column 就是 fx node 的種類:
table([row[:4] for row in node_rows(gm, show_args=False)], ["#", "op", "name", "target"])| # | op | name | target |
|---|---|---|---|
| 0 | get_attr | conv_weight | conv.weight |
| 1 | get_attr | bn_weight | bn.weight |
| 2 | get_attr | bn_bias | bn.bias |
| 3 | get_attr | bn_running_mean | bn.running_mean |
| 4 | get_attr | bn_running_var | bn.running_var |
| 5 | get_attr | bn_num_batches_tracked | bn.num_batches_tracked |
| 6 | placeholder | x | x |
| 7 | call_module | _guards_fn | _guards_fn |
| 8 | call_function | conv2d | conv2d |
| 9 | call_function | batch_norm | batch_norm |
| 10 | call_function | relu | relu |
| 11 | output | output | output |
placeholder:圖的輸入;get_attr:讀 GraphModule 上的參數或 buffer;call_function:呼叫一個函式(這裡都是 ATen op);output:圖的輸出。call_module的_guards_fn是ep.module()預設插入的檢查:呼叫時確認輸入符合 export 時的假設(例如 shape),與量化無關。前面的圖沒有畫它。
get_attr 的 target 正是 graph_signature 裡的 target,ep.module() 的輸出也和原模型完全相同:
targets = {spec.target for spec in ep.graph_signature.input_specs if spec.target is not None}
assert {n.target for n in gm.graph.nodes if n.op == "get_attr"} == targets
with torch.no_grad():
    err = (model(*ex) - gm(*ex)).abs().max().item()
print(f"model(x) 與 ep.module()(x) 的最大誤差 = {err}")
assert err == 0
model(x) 與 ep.module()(x) 的最大誤差 = 0.0A3. 每個 node 的 meta
每個 node 有一個 meta 字典,記錄 export 時收集到的資訊。其中最常用的是 meta["val"]: export 用「假的 tensor」(FakeTensor,只有 shape、dtype、device,沒有數值)跑過一遍模型,記下這個 node 會產生什麼。
rows = []
for n in gm.graph.nodes:
    if n.op == "call_function":
        val = n.meta["val"]
        rows.append([n.name, type(val).__name__, str(list(val.shape)), ", ".join(sorted(n.meta))])
table(rows, ["node", "meta['val'] 的型別", "shape", "meta 的 keys"])| node | meta['val'] 的型別 | shape | meta 的 keys |
|---|---|---|---|
| conv2d | FakeTensor | [2, 8, 16, 16] | from_node, nn_module_stack, stack_trace, tensor_meta, torch_fn, val |
| batch_norm | FakeTensor | [2, 8, 16, 16] | from_node, nn_module_stack, stack_trace, tensor_meta, torch_fn, val |
| relu | FakeTensor | [2, 8, 16, 16] | from_node, nn_module_stack, stack_trace, tensor_meta, torch_fn, val |
shape 的第 0 維是 2,因為 example input 的 batch 是 2;export 預設把 shape 寫死(common.pt2e.export_module() 會把 batch 設成動態,M01 起都用它)。
現在 meta 裡還沒有量化相關的東西。之後 quantizer 的標註也會寫進同一個 meta,key 是 quantization_annotation(M01-2、M03)。
思考題:這張圖裡 conv2d 的 weight 是從哪一個 node 來的?
conv = next(n for n in gm.graph.nodes if n.name == "conv2d")
weight_node = conv.args[1]
print(f"conv2d.args[1] = {weight_node.name}(op={weight_node.op}, target={weight_node.target})")
assert weight_node.op == "get_attr"
conv2d.args[1] = conv_weight(op=get_attr, target=conv.weight)答案:來自 get_attr node conv_weight(target 是 conv.weight),它是 conv2d 的第 1 個參數。 之後量化 weight 的標註,就掛在使用它的 conv2d node 上:「conv2d 的 weight 那條輸入邊要用什麼規格」。
B. ATen 是什麼?
B1. aten.conv2d.default 這串名字怎麼讀
圖上 conv2d node 的 target 是 torch.ops.aten.conv2d.default。它由三段組成:
conv_op = torch.ops.aten.conv2d
print(f"torch.ops.aten.conv2d             {type(conv_op).__name__}:一個 op 的所有 overload")
print(f"torch.ops.aten.conv2d.overloads() {conv_op.overloads()}")
print(f"torch.ops.aten.conv2d.default     {type(conv_op.default).__name__}:其中一個 overload")
print(f"  簽名:{conv_op.default._schema}")
print(f"對照 torch.ops.aten.add.Tensor")
print(f"  簽名:{torch.ops.aten.add.Tensor._schema}")
assert conv.target is torch.ops.aten.conv2d.default
torch.ops.aten.conv2d OpOverloadPacket:一個 op 的所有 overload
torch.ops.aten.conv2d.overloads() ['default', 'padding']
torch.ops.aten.conv2d.default OpOverload:其中一個 overload
簽名:aten::conv2d(Tensor input, Tensor weight, Tensor? bias=None, SymInt[2] stride=[1, 1], SymInt[2] padding=[0, 0], SymInt[2] dilation=[1, 1], SymInt groups=1) -> Tensor
對照 torch.ops.aten.add.Tensor
簽名:aten::add.Tensor(Tensor self, Tensor other, *, Scalar alpha=1) -> Tensoraten(名稱空間).conv2d(op).default(overload)。同一個 op 可以依參數型別有好幾個版本, 例如 add 有 add.Tensor(兩個 tensor 相加)、add.Scalar(tensor 加一個數)等。
ATen 是 PyTorch 的核心 tensor 函式庫,其他 Python/C++ 介面幾乎都建在它上面(官方 C++ 文件); torch.ops.aten.* 是它在 Python 端的 op 名稱。
B2. 三種寫法,export 之後是同一串 op
同一個模型(conv → relu → 平均 → linear)用三種 Python 寫法:
class FunctionalStyle(nn.Module):
    """全部用 torch.nn.functional 寫,參數自己宣告。"""

    def __init__(self):
        super().__init__()
        self.w = nn.Parameter(torch.randn(8, 3, 3, 3))
        self.fc_w = nn.Parameter(torch.randn(4, 8))

    def forward(self, x):
        return F.linear(F.relu(F.conv2d(x, self.w, padding=1)).mean((2, 3)), self.fc_w)


class Inner(nn.Module):
    def __init__(self):
        super().__init__()
        self.conv = nn.Conv2d(3, 8, 3, padding=1, bias=False)
        self.act = nn.ReLU()

    def forward(self, x):
        return self.act(self.conv(x))


class WrappedStyle(nn.Module):
    """自訂 Module 再包 nn.Conv2d/nn.ReLU/nn.Linear,多一層 Python 類別。"""

    def __init__(self):
        super().__init__()
        self.inner = Inner()
        self.fc = nn.Linear(8, 4, bias=False)

    def forward(self, x):
        return self.fc(self.inner(x).mean((2, 3)))


class SequentialStyle(nn.Module):
    """用 nn.Sequential 寫。"""

    def __init__(self):
        super().__init__()
        self.body = nn.Sequential(nn.Conv2d(3, 8, 3, padding=1, bias=False), nn.ReLU())
        self.fc = nn.Linear(8, 4, bias=False)

    def forward(self, x):
        return self.fc(self.body(x).mean((2, 3)))
每種寫法用兩種方式抓圖,列出圖上的運算 node:
torch.fx.symbolic_trace(model):fx 原本的抓圖方式(PT2E 之前的 FX graph mode 量化用它)。torch.export.export(model, (x,)).module():PT2E 用的方式。
def fx_ops(gm):
    """symbolic_trace 的圖:call_module 印模組類別(與它在模型裡的路徑),call_function 印函式名,call_method 印方法名。"""
    out = []
    for n in gm.graph.nodes:
        if n.op == "call_module":
            out.append(f"module {type(gm.get_submodule(n.target)).__name__}({n.target})")
        elif n.op == "call_function":
            out.append(f"function {n.target.__name__}")
        elif n.op == "call_method":
            out.append(f"method {n.target}")
    return out


def export_ops(gm):
    return [n.target for n in gm.graph.nodes if n.op == "call_function"]


ex_small = (torch.randn(2, 3, 8, 8),)
styles = [FunctionalStyle, WrappedStyle, SequentialStyle]
fx_lists = [fx_ops(torch.fx.symbolic_trace(cls())) for cls in styles]
export_lists = [export_ops(export(cls().eval(), ex_small).module()) for cls in styles]
table([[cls.__name__, " → ".join(f), " → ".join(short(t) for t in e)]
       for cls, f, e in zip(styles, fx_lists, export_lists)],
["寫法", "symbolic_trace 的 node", "export 的 node(aten.*)"])| 寫法 | symbolic_trace 的 node | export 的 node(aten.*) |
|---|---|---|
| FunctionalStyle | function conv2d → function relu → method mean → function linear | conv2d → relu → mean → linear |
| WrappedStyle | module Conv2d(inner.conv) → module ReLU(inner.act) → method mean → module Linear(fc) | conv2d → relu → mean → linear |
| SequentialStyle | module Conv2d(body.0) → module ReLU(body.1) → method mean → module Linear(fc) | conv2d → relu → mean → linear |
assert all(e == export_lists[0] for e in export_lists)  # export:三種寫法的 node.target 完全相同
assert len({tuple(f) for f in fx_lists}) == 3  # symbolic_trace:三種寫法各不相同
print("export 的 node.target:", [str(t) for t in export_lists[0]])
export 的 node.target: ['aten.conv2d.default', 'aten.relu.default', 'aten.mean.dim', 'aten.linear.default']- symbolic_trace 的圖跟著寫法走:
nn.Conv2d留成call_module(module 層級,連它在模型裡的路徑inner.conv、body.0都留著),F.conv2d是一個 Python 函式,.mean()是一個 method。 同一個 conv 有好幾種長相,拿到這張圖的人得認得每一種 Module 類別和每一種 Python 寫法。 - export 的圖不管怎麼寫,都是同一串
aten.*op;module 的階層也被攤平了。
這對後端很重要:後端拿到圖,要逐個 node 判斷「我有沒有這個運算的 kernel」。圖的詞彙統一成 ATen op,後端只要對照自己支援的 op 清單即可。 PyTorch 文件也這樣定位 Core ATen 這組 op:它是 “designed to serve as the functional IR to interface with backends” (IRs)。 PT2E 的 quantizer 用 node.target == torch.ops.aten.conv2d.default 找 conv,也是靠這一點(M03)。 本章概覽對這件事有更完整的說明。
B3. 由上到下的層次
| 層 | 是什麼 | 在 export 的圖裡 |
|---|---|---|
nn.Conv2d、自訂 Module |
Python 類別 | export 之後消失 |
F.conv2d |
Python 函式 | export 之後消失 |
torch.ops.aten.conv2d.default |
op 的名稱 | 就是 node.target |
| 各裝置上的 C++ 實作(kernel) | 實際計算的程式 | 不在圖上,執行時才選用(B4) |
ATen op 還能再拆成更底層的 op(例如 conv2d → convolution),見 M00-3。
B4. op 執行時怎麼找到 kernel
export 只在圖上留下 op 的名稱。真正執行時(eager 模式,以 z = x + y、x 與 y 都是 CPU tensor 為例):
- Python 的
x + y呼叫torch.add,進入 ATen 的aten::add.Tensor。 - dispatcher 看 tensor 的 dispatch key,決定走哪一層實作:backend(CPU/CUDA/MPS…)、autograd、quantized 等。需要梯度時會先經過 autograd 那一層。
- backend 的 kernel 執行:ATen 自己帶有 CPU、CUDA、MPS 的實作;有些 op 會再呼叫 cuBLAS、cuDNN 這類函式庫。
- dtype(float32 等)通常在 kernel 內部再切換,不是 dispatcher 那一層決定的。
- 結果包成 Tensor 回傳 Python。
dispatch 之後,kernel 內部還可能依輸入再選實作(M07-1 用 profiler 看到 conv 依 batch size 切換實作)。 以上是一般說明,各步驟的先後沒有逐行追過原始碼。
小結
torch.export.export()回傳 ExportedProgram:參數是 placeholder,graph_signature記下對應;ep.module()把參數綁回成get_attr,PT2E 用這個 GraphModule。- 圖是扁平的,只剩 ATen op;每個 node 的
meta["val"]記著輸出的 shape/dtype,量化標註之後也寫在meta。 - 不同的 Python 寫法 export 成同一串 ATen op,後端與 quantizer 只需要認得這組 op。